# Microsoft Office

# Herausfinden welche Microsoft Office Version ich habe

<div class="responsive-iframe" id="bkmrk-"><iframe allowfullscreen="allowfullscreen" frameborder="0" height="332" src="https://video.elaion.ch?video_by_id=uA2U9dbQpzHz" width="590"></iframe>

</div>[↓ Download](https://video.elaion.ch/data/videos_by_id/uA2U9dbQpzHz/uA2U9dbQpzHz_1080p.mp4?11_HerausfindenMSOfficeVersion_END_v01.mp4)


#### **<span style="text-decoration: underline;">Schritt-für-Schritt-Anleitung:   
</span>**

##### Wie finde ich heraus, welche Version von Microsoft Office auf meinem Computer installiert ist? (Office ist ein Programm zum Schreiben, etc.)

<table border="1" id="bkmrk-wir-gehen-hin-und%C2%A0-%C3%B6" style="border-collapse: collapse; width: 112.716%; height: 1740.63px;"><colgroup><col style="width: 58.3236%;"></col><col style="width: 41.6764%;"></col></colgroup><tbody><tr style="height: 249px;"><td style="height: 249px;">**Das Programm Word öffnen:**  
Doppelklick auf das Word-Icon (= Symbol)  
  
</td><td style="height: 249px;">[![grafik.png](https://support.elaion.ch/uploads/images/gallery/2024-01/scaled-1680-/76v6LhEDz4t0cIyc-grafik.png)](https://support.elaion.ch/uploads/images/gallery/2024-01/76v6LhEDz4t0cIyc-grafik.png)</td></tr><tr style="height: 208.6px;"><td style="height: 208.6px;">Beim Öffnen sieht man ganz kurz, welche Version es ist.  
Siehe roter Pfeil.  
</td><td style="height: 208.6px;">[![grafik.png](https://support.elaion.ch/uploads/images/gallery/2024-01/scaled-1680-/8OPp1NmaOQG8OuCg-grafik.png)](https://support.elaion.ch/uploads/images/gallery/2024-01/8OPp1NmaOQG8OuCg-grafik.png)</td></tr><tr style="height: 214.45px;"><td style="height: 214.45px;">Wem das zu schnell geht und man die Jahreszahl nicht herauslesen kann:   
Klicke auf den Reiter **"Datei"** (du findeste diesen oben links in deinem Word-Programm). Klicke dann auf **"Konto".** Da sieht man **rechts: "Produktinformationen Microsoft Office Standard 2019"**. Das bedeutet, ich habe auf diesem Laptop/Computer die Version 2019 installiert.</td><td style="height: 214.45px;">[![grafik.png](https://support.elaion.ch/uploads/images/gallery/2024-01/scaled-1680-/0ybhRYFF4HsAQnqd-grafik.png)](https://support.elaion.ch/uploads/images/gallery/2024-01/0ybhRYFF4HsAQnqd-grafik.png)

[![Konto.png](https://support.elaion.ch/uploads/images/gallery/2024-01/scaled-1680-/L8kYqBzHxT3c3CBj-konto.png)](https://support.elaion.ch/uploads/images/gallery/2024-01/L8kYqBzHxT3c3CBj-konto.png)

[![Produktinformation.png](https://support.elaion.ch/uploads/images/gallery/2024-01/scaled-1680-/K0CHvhKkE0zp6ixP-produktinformation.png)](https://support.elaion.ch/uploads/images/gallery/2024-01/K0CHvhKkE0zp6ixP-produktinformation.png)

</td></tr><tr style="height: 188.25px;"><td style="height: 188.25px;">**Bei älteren Versionen** sieht man oft schon an der Beschreibung des **Icons (=Symbol)**, um welche Microsoft Word-Version es sich handelt. In diesem Beispiel (Bild rechts) ist es die Version aus dem Jahr 2010.  
</td><td style="height: 188.25px;">[![Beschreibung.png](https://support.elaion.ch/uploads/images/gallery/2024-01/scaled-1680-/uBoYVW8z5P73x8Rv-beschreibung.png)](https://support.elaion.ch/uploads/images/gallery/2024-01/uBoYVW8z5P73x8Rv-beschreibung.png)</td></tr><tr style="height: 223.167px;"><td style="height: 223.167px;">Wenn die Jahreszahl in der Beschreibung des Icons (=Symbol) nicht ersichtlich ist, kann man die Version auch hier herauslesen:   
Unten links auf das **Start-Symbol** drücken und auf der Tastatur **"Word"** eintippen. Nun sieht man die Bezeichnung "Microsoft Word 2010".   
</td><td style="height: 223.167px;">[![ksnip_20240108-235652.png](https://support.elaion.ch/uploads/images/gallery/2024-01/scaled-1680-/RY0tGRhGyAsKTGbq-ksnip-20240108-235652.png)](https://support.elaion.ch/uploads/images/gallery/2024-01/RY0tGRhGyAsKTGbq-ksnip-20240108-235652.png)

[![grafik.png](https://support.elaion.ch/uploads/images/gallery/2024-01/scaled-1680-/OD0uuyJVJMCqVMCW-grafik.png)](https://support.elaion.ch/uploads/images/gallery/2024-01/OD0uuyJVJMCqVMCW-grafik.png)

</td></tr><tr style="height: 63.4px;"><td style="height: 63.4px;">**Alternativ kann man es auch auf diesem Weg finden:** Word-Programm öffnen. Klicke oben links auf **"Datei",** dann **"Hilfe"**. Nun siehst du rechts **"Produkt aktiviert" -&gt;** "Microsoft Office Professional Plus 2010"</td><td style="height: 63.4px;">[![Office2010_Aktivierung1-2461283349.jpg](https://support.elaion.ch/uploads/images/gallery/2024-01/scaled-1680-/7RUU3kZenesk3Gd4-office2010-aktivierung1-2461283349.jpg)](https://support.elaion.ch/uploads/images/gallery/2024-01/7RUU3kZenesk3Gd4-office2010-aktivierung1-2461283349.jpg)

</td></tr><tr style="height: 113.8px;"><td style="height: 113.8px;">**Bei Word 2007-Version:** Word-Programm öffnen. Dann oben auf den **Office-Knopf** klicken. Dann auf **"Word-Optionen"**. Hier links unter **"Ressourcen"** findet man die Rubrik **"Infos"**. Dort sieht man die Jahreszahl der Word-Version.  
</td><td style="height: 113.8px;">[![Clipboard - January 9, 2024 11_38.png](https://support.elaion.ch/uploads/images/gallery/2024-01/scaled-1680-/vbc1glj2t9TBgNLH-clipboard-january-9-2024-11-38.png)](https://support.elaion.ch/uploads/images/gallery/2024-01/vbc1glj2t9TBgNLH-clipboard-january-9-2024-11-38.png)

[![Clipboard - January 9, 2024 11_40.png](https://support.elaion.ch/uploads/images/gallery/2024-01/scaled-1680-/J4xwmOsauvEzDfxM-clipboard-january-9-2024-11-40.png)](https://support.elaion.ch/uploads/images/gallery/2024-01/J4xwmOsauvEzDfxM-clipboard-january-9-2024-11-40.png)

</td></tr><tr style="height: 80.1167px;"><td style="height: 80.1167px;">**Beim Mac:** Unten, wenn ich das Word offen habe, kann ich hier oben ganz links auf **"Word"**. Dann **"Info"**. Dann **"Info Microsoft Word**" anklicken. Und dann sehe ich hier Lizenz Office LTS Standard Mac 2021.  
</td><td style="height: 80.1167px;">[![Clipboard - January 9, 2024 11_48.png](https://support.elaion.ch/uploads/images/gallery/2024-01/scaled-1680-/MFRuwdq8M5PDGdsE-clipboard-january-9-2024-11-48.png)](https://support.elaion.ch/uploads/images/gallery/2024-01/MFRuwdq8M5PDGdsE-clipboard-january-9-2024-11-48.png)[![Clipboard - January 9, 2024 11_49.png](https://support.elaion.ch/uploads/images/gallery/2024-01/scaled-1680-/kzB8oKRbQFrI7NBl-clipboard-january-9-2024-11-49.png)](https://support.elaion.ch/uploads/images/gallery/2024-01/kzB8oKRbQFrI7NBl-clipboard-january-9-2024-11-49.png)</td></tr></tbody></table>


---

<table border="1" id="bkmrk-auf-telegram-wirst-d" style="border-collapse: collapse; width: 100%; border-width: 0px; height: 95px;"><colgroup><col style="width: 8.33341%;"></col><col style="width: 91.7902%;"></col></colgroup><tbody><tr><td style="border-width: 0px;">[![grafik.png](https://www.anti-control.info/uploads/images/gallery/2024-07/scaled-1680-/JgEnYZRdli5OV6Vl-grafik.png)](https://t.me/anti_control_info)</td><td style="border-width: 0px;">##### <span style="color: rgb(0, 0, 0);">Auf Telegram wirst du informiert sobald ein neuer Artikel veröffentlicht wird!  
</span><span style="color: rgb(0, 0, 0);">HIER ABONNIEREN: </span><span style="color: rgb(0, 0, 0);">[https://t.me/anti\_control\_info](https://t.me/anti_control_info)</span>

</td></tr></tbody></table>

# Datenschutz-Einstellungen in Office (diverse Häkchen setzen)

# OFFICE 2007: Datenschutz-Häkchen richtig setzen

<div class="responsive-iframe" id="bkmrk-"><iframe allowfullscreen="allowfullscreen" frameborder="0" height="332" src="https://video.elaion.ch?video_by_id=yZge482URehg" width="590"></iframe>

</div><div class="responsive-iframe" id="bkmrk--1"></div><div class="responsive-iframe" id="bkmrk-%E2%86%93-download">[↓ Download](https://video.elaion.ch/data/videos_by_id/yZge482URehg/yZge482URehg_1080p.mp4?121_DatenschutzOffice2007_END_v01.mp4)</div>
#### <span style="text-decoration: underline;">**Schritt-für-Schritt-Anleitung:** </span>

#####  OFFICE 2007: Datenschutz-Häkchen in Office 2007 richtig setzen - keine Überwachung!

<div class="responsive-iframe" id="bkmrk-das-programm-word-%C3%B6f"><table border="1" style="border-collapse: collapse; width: 100%; height: 249px;"><tbody><tr><td style="width: 47.6929%;">**Das Programm Word öffnen:**  
Doppelklick auf das Word-Icon (=Symbol)  
  
</td><td style="width: 52.3895%;">![grafik.png](https://support.elaion.ch/uploads/images/gallery/2024-01/scaled-1680-/76v6LhEDz4t0cIyc-grafik.png)</td></tr><tr><td style="width: 47.6929%;">Oben links bei Office 2007 auf diesen Knopf hier klicken.

</td><td style="width: 52.3895%;">[![2024-01-09 20 42 23.png](https://support.elaion.ch/uploads/images/gallery/2024-01/scaled-1680-/YEf0LX3oEPNeA85f-2024-01-09-20-42-23.png)](https://support.elaion.ch/uploads/images/gallery/2024-01/YEf0LX3oEPNeA85f-2024-01-09-20-42-23.png)

</td></tr><tr><td style="width: 47.6929%;">Wähle hier "Word-Optionen".</td><td style="width: 52.3895%;">[![2024-01-09 20 57 26 (2).png](https://support.elaion.ch/uploads/images/gallery/2024-01/scaled-1680-/Jo6ThBtRpkuLdrwv-2024-01-09-20-57-26-2.png)](https://support.elaion.ch/uploads/images/gallery/2024-01/Jo6ThBtRpkuLdrwv-2024-01-09-20-57-26-2.png)</td></tr><tr><td style="width: 47.6929%;">Hier auf "**Vertrauenseinstellungen**" klicken.  
</td><td style="width: 52.3895%;">[![2024-01-09 20 57 26 (3).png](https://support.elaion.ch/uploads/images/gallery/2024-01/scaled-1680-/vGYptsqqtxTQyfEn-2024-01-09-20-57-26-3.png)](https://support.elaion.ch/uploads/images/gallery/2024-01/vGYptsqqtxTQyfEn-2024-01-09-20-57-26-3.png)</td></tr><tr><td style="width: 47.6929%;">Rechts "**Einstellungen für das Vertrauensstellungscenter**" anklicken.   
</td><td style="width: 52.3895%;">[![2024-01-09 20 57 26 (4).png](https://support.elaion.ch/uploads/images/gallery/2024-01/scaled-1680-/2HfmJt2QgHG1A77v-2024-01-09-20-57-26-4.png)](https://support.elaion.ch/uploads/images/gallery/2024-01/2HfmJt2QgHG1A77v-2024-01-09-20-57-26-4.png)</td></tr><tr><td style="width: 47.6929%;">Klicke auf "**Datenschutzoptionen**"

</td><td style="width: 52.3895%;">[![2024-01-09 20 57 26 (5).png](https://support.elaion.ch/uploads/images/gallery/2024-01/scaled-1680-/mbbcs90Djcg48f2A-2024-01-09-20-57-26-5.png)](https://support.elaion.ch/uploads/images/gallery/2024-01/mbbcs90Djcg48f2A-2024-01-09-20-57-26-5.png)  
</td></tr><tr><td style="width: 47.6929%;">Nimm unter "**Datenschutzoptionen**" alle Haken raus ("Microsoft Office Online nach Hilfeinhalt durchsuchen", "Microsoft Office Online-Verknüpfung aktualisieren" ect.) <span style="outline-color: var(--color-primary); font-style: normal; font-variant-ligatures: normal; font-variant-caps: normal; font-size: 14px; font-family: -apple-system, BlinkMacSystemFont, 'Segoe UI', Oxygen, Ubuntu, Roboto, Cantarell, 'Fira Sans', 'Droid Sans', 'Helvetica Neue', sans-serif;">und klicken </span><span style="font-family: -apple-system, BlinkMacSystemFont, 'Segoe UI', Oxygen, Ubuntu, Roboto, Cantarell, 'Fira Sans', 'Droid Sans', 'Helvetica Neue', sans-serif; font-size: 14px; font-style: normal; font-variant-ligatures: normal; font-variant-caps: normal; outline-color: var(--color-primary);">anschließend auf "**OK**".</span>

<span style="font-family: -apple-system, BlinkMacSystemFont, 'Segoe UI', Oxygen, Ubuntu, Roboto, Cantarell, 'Fira Sans', 'Droid Sans', 'Helvetica Neue', sans-serif; font-size: 14px; font-style: normal; font-variant-ligatures: normal; font-variant-caps: normal; outline-color: var(--color-primary);">Das muss man nur im Word machen und sogleich ist es automatisch auch in Excel, Power-Point und allen Programmen von Office so eingestellt.</span>

</td><td style="width: 52.3895%;">[![2024-01-09 20 57 27.png](https://support.elaion.ch/uploads/images/gallery/2024-01/scaled-1680-/zcUY3Vh9lA9d7zHZ-2024-01-09-20-57-27.png)](https://support.elaion.ch/uploads/images/gallery/2024-01/zcUY3Vh9lA9d7zHZ-2024-01-09-20-57-27.png)  
</td></tr></tbody></table>

</div>---

<table border="1" id="bkmrk-auf-telegram-wirst-d" style="border-collapse: collapse; width: 100%; border-width: 0px; height: 95px;"><colgroup><col style="width: 8.33341%;"></col><col style="width: 91.7902%;"></col></colgroup><tbody><tr><td style="border-width: 0px;">[![grafik.png](https://www.anti-control.info/uploads/images/gallery/2024-07/scaled-1680-/JgEnYZRdli5OV6Vl-grafik.png)](https://t.me/anti_control_info)</td><td style="border-width: 0px;">##### <span style="color: rgb(0, 0, 0);">Auf Telegram wirst du informiert sobald ein neuer Artikel veröffentlicht wird!  
</span><span style="color: rgb(0, 0, 0);">HIER ABONNIEREN: </span><span style="color: rgb(0, 0, 0);">[https://t.me/anti\_control\_info](https://t.me/anti_control_info)</span>

</td></tr></tbody></table>

# OFFICE 2010: Datenschutz-Häkchen richtig setzen - keine Überwachung

<div class="responsive-iframe" id="bkmrk-"><iframe allowfullscreen="allowfullscreen" frameborder="0" height="332" src="https://video.elaion.ch?video_by_id=CUigz7sUhQw2" width="590"></iframe>

</div><div class="responsive-iframe" id="bkmrk--1"></div><div class="responsive-iframe" id="bkmrk--2"></div><div class="responsive-iframe" id="bkmrk--3"></div><div class="responsive-iframe" id="bkmrk--4"></div>[↓ Download](https://video.elaion.ch/data/videos_by_id/CUigz7sUhQw2/CUigz7sUhQw2_1080p.mp4?122_DatenschutzOffice2010_END_v01.mp4)

#### <span style="text-decoration: underline;">**Schritt-für-Schritt-Anleitung:** </span>

<p class="callout info">Wir schauen uns an, wie wir bei Office 2010 alles so einstellen, dass möglichst wenig Informationen an Microsoft übermittelt werden.</p>

<table border="1" id="bkmrk-wir-gehen-hin-und%C2%A0-%C3%B6" style="border-collapse: collapse; width: 100%; height: 846.483px;"><colgroup><col style="width: 60.9394%;"></col><col style="width: 39.0606%;"></col></colgroup><tbody><tr style="height: 249px;"><td style="height: 249px;">**Das Programm Word öffnen:**  
Doppelklick auf das Word-Icon (=Symbol)  
  
</td><td style="height: 249px;">[![grafik.png](https://support.elaion.ch/uploads/images/gallery/2024-01/scaled-1680-/76v6LhEDz4t0cIyc-grafik.png)](https://support.elaion.ch/uploads/images/gallery/2024-01/76v6LhEDz4t0cIyc-grafik.png)</td></tr><tr style="height: 223.5px;"><td style="height: 223.5px;">Wir gehen hier auf **"Datei"** ganz oben links.  
</td><td style="height: 223.5px;"> [![01.JPG](https://support.elaion.ch/uploads/images/gallery/2024-01/scaled-1680-/DepMlHYi1wG9DAUH-01.JPG)](https://support.elaion.ch/uploads/images/gallery/2024-01/DepMlHYi1wG9DAUH-01.JPG)

</td></tr><tr style="height: 232.383px;"><td style="height: 232.383px;">Dann wählen wir unten **"Optionen**".</td><td style="height: 232.383px;">  
[![02.jpg](https://support.elaion.ch/uploads/images/gallery/2024-01/scaled-1680-/WgJTtvYEJb65soxu-02.jpg)](https://support.elaion.ch/uploads/images/gallery/2024-01/WgJTtvYEJb65soxu-02.jpg)

</td></tr><tr style="height: 35.4px;"><td style="height: 35.4px;">Dann öffnet sich ein neues Fenster, dort auf **"Sicherheitscenter"** klicken.  
</td><td style="height: 35.4px;">[![03.jpg](https://support.elaion.ch/uploads/images/gallery/2024-01/scaled-1680-/pf7f5zx0rPHrBPKE-03.jpg)](https://support.elaion.ch/uploads/images/gallery/2024-01/pf7f5zx0rPHrBPKE-03.jpg)

</td></tr><tr style="height: 35.4px;"><td style="height: 35.4px;">Dann rechts in dem Fenster auf **"Einstellungen für das Sicherheitscenter".**

</td><td style="height: 35.4px;">[![04.jpg](https://support.elaion.ch/uploads/images/gallery/2024-01/scaled-1680-/NMxAr1XLVzhvBy1Y-04.jpg)](https://support.elaion.ch/uploads/images/gallery/2024-01/NMxAr1XLVzhvBy1Y-04.jpg)

</td></tr><tr style="height: 35.4px;"><td style="height: 35.4px;">Dann auf **"Datenschutzoptionen"** klicken,

und alle Häkchen rausnehmen

</td><td style="height: 35.4px;">[![05.jpg](https://support.elaion.ch/uploads/images/gallery/2024-01/scaled-1680-/87j5J6bbYuqRQCpY-05.jpg)](https://support.elaion.ch/uploads/images/gallery/2024-01/87j5J6bbYuqRQCpY-05.jpg)

</td></tr><tr style="height: 35.4px;"><td style="height: 35.4px;">Und dann können wir unten auf **"OK"** drücken.

(Und es sind alle Einstellungen darin.)

</td><td style="height: 35.4px;">[![06.jpg](https://support.elaion.ch/uploads/images/gallery/2024-01/scaled-1680-/xwnz8OhIV2zY1qVu-06.jpg)](https://support.elaion.ch/uploads/images/gallery/2024-01/xwnz8OhIV2zY1qVu-06.jpg)

</td></tr></tbody></table>

<p class="callout info">Diese Einstellungen muss man nur einmal in Word machen und dann zählt sie auch für Excel, Power-Point und alle Office Programme.</p>

---

<table border="1" id="bkmrk-auf-telegram-wirst-d" style="border-collapse: collapse; width: 100%; border-width: 0px; height: 95px;"><colgroup><col style="width: 8.33341%;"></col><col style="width: 91.7902%;"></col></colgroup><tbody><tr><td style="border-width: 0px;">[![grafik.png](https://www.anti-control.info/uploads/images/gallery/2024-07/scaled-1680-/JgEnYZRdli5OV6Vl-grafik.png)](https://t.me/anti_control_info)</td><td style="border-width: 0px;">##### <span style="color: rgb(0, 0, 0);">Auf Telegram wirst du informiert sobald ein neuer Artikel veröffentlicht wird!  
</span><span style="color: rgb(0, 0, 0);">HIER ABONNIEREN: </span><span style="color: rgb(0, 0, 0);">[https://t.me/anti\_control\_info](https://t.me/anti_control_info)</span>

</td></tr></tbody></table>

# Office 2013-2021: Datenschutz-Häkchen in Office richtig setzen - keine Überwachung

<div class="responsive-iframe" id="bkmrk-"><iframe allowfullscreen="allowfullscreen" frameborder="0" height="332" src="https://video.elaion.ch?video_by_id=7RStdhzhJrHi" width="590"></iframe>

</div><div class="responsive-iframe" id="bkmrk-%E2%86%93-download">[↓ Download](https://video.elaion.ch/data/videos_by_id/7RStdhzhJrHi/7RStdhzhJrHi_1080p.mp4?123_DatenschutzOffice2013-21_END_v01.mp4)</div><div class="responsive-iframe" id="bkmrk--1"></div>
#### <span data-darkreader-inline-bgcolor="" style="text-decoration: underline; background-color: rgb(255, 255, 255);">**Schritt für Schritt Anleitung:** </span>

#####  Wie kann ich die Datenschutz-Häkchen in Office richtig setzen?

<div class="responsive-iframe" id="bkmrk--3"></div><p class="callout success">Hinweis: Es ist egal, ob ihr die folgenden Einstellungen im Programm Word, Excel oder PowerPoint macht. Wenn ihr es in einem Programm einrichtet, ist es zeitgleich für alle anderen Office-Programme so eingestellt.   
</p>

<div class="responsive-iframe" id="bkmrk--4"></div><div class="responsive-iframe" id="bkmrk--5"></div><div class="responsive-iframe" id="bkmrk-%C3%96ffne-das-programm-w"><table border="1" style="border-collapse: collapse; width: 100%; height: 2487.78px;"><colgroup><col style="width: 58.2246%;"></col><col style="width: 41.7754%;"></col></colgroup><tbody><tr style="height: 357.817px;"><td style="height: 357.817px;">Öffne das Programm Word (oder Excel oder Powerpoint). [![grafik.png](https://support.elaion.ch/uploads/images/gallery/2024-01/scaled-1680-/68m0CKf3PHNPb9sO-grafik.png)](https://support.elaion.ch/uploads/images/gallery/2024-01/68m0CKf3PHNPb9sO-grafik.png)

  
Gehe oben links auf "Datei", dann links zuunterst auf die Auswahl "Optionen"

</td><td style="height: 357.817px;">[![grafik.png](https://support.elaion.ch/uploads/images/gallery/2024-01/scaled-1680-/YY59603IHG5Ha45K-grafik.png)](https://support.elaion.ch/uploads/images/gallery/2024-01/YY59603IHG5Ha45K-grafik.png)

[![grafik.png](https://support.elaion.ch/uploads/images/gallery/2024-01/scaled-1680-/dKWnD9vQLRulxTef-grafik.png)](https://support.elaion.ch/uploads/images/gallery/2024-01/dKWnD9vQLRulxTef-grafik.png)

</td></tr><tr style="height: 488.75px;"><td style="height: 488.75px;">Wähle nun "Trust Center" (1) aus.   
Dann klickst Du auf den Knopf "Einstellungen für das Trust Center" (2).

[![grafik.png](https://support.elaion.ch/uploads/images/gallery/2024-01/scaled-1680-/oZoQ69Ls2xpmrGZR-grafik.png)](https://support.elaion.ch/uploads/images/gallery/2024-01/oZoQ69Ls2xpmrGZR-grafik.png)

</td><td style="height: 488.75px;">[![grafik.png](https://support.elaion.ch/uploads/images/gallery/2024-01/scaled-1680-/opN7KOzBpSk4mpCW-grafik.png)](https://support.elaion.ch/uploads/images/gallery/2024-01/opN7KOzBpSk4mpCW-grafik.png)

[![grafik.png](https://support.elaion.ch/uploads/images/gallery/2024-01/scaled-1680-/wI6n7qU4UGIXH4yU-grafik.png)](https://support.elaion.ch/uploads/images/gallery/2024-01/wI6n7qU4UGIXH4yU-grafik.png)

</td></tr><tr style="height: 503.633px;"><td style="height: 503.633px;">Klicke auf den zweit-untersten Punkt "Datenschutzoptionen" (3).   
Nun wählst Du den Knopf auf der rechten Seite "Datenschutzeinstellungen" (4).

[![grafik.png](https://support.elaion.ch/uploads/images/gallery/2024-01/scaled-1680-/kA1sNvaOtVVQ7YsM-grafik.png)](https://support.elaion.ch/uploads/images/gallery/2024-01/kA1sNvaOtVVQ7YsM-grafik.png)

</td><td style="height: 503.633px;">[![grafik.png](https://support.elaion.ch/uploads/images/gallery/2024-01/scaled-1680-/dNF2p8T6Iwf6eG1w-grafik.png)](https://support.elaion.ch/uploads/images/gallery/2024-01/dNF2p8T6Iwf6eG1w-grafik.png)

[![grafik.png](https://support.elaion.ch/uploads/images/gallery/2024-01/scaled-1680-/XgFBiqMmYllMd8xt-grafik.png)](https://support.elaion.ch/uploads/images/gallery/2024-01/XgFBiqMmYllMd8xt-grafik.png)

</td></tr><tr style="height: 779.617px;"><td style="height: 779.617px;">In dieser sich nun öffnenden Übersicht <span style="text-decoration: underline;">**nimmst Du alle Haken raus**</span>:

- Optionale Diagnosedaten

- Erfahrungen, die Ihren Inhalt analysieren

- Erfahrungen, die Onlineinhalte herunterladen

- Alle verbundenen Erfahrungen (das ist der wichtigste Punkt! Der läuft unter dem Microsoft-Servicevertrag)

- Personalisierte Angebote und Rabatte für Microsoft-Produkte

</td><td style="height: 779.617px;">[![grafik.png](https://support.elaion.ch/uploads/images/gallery/2024-01/scaled-1680-/VyOHfugV74S5rrDf-grafik.png)](https://support.elaion.ch/uploads/images/gallery/2024-01/VyOHfugV74S5rrDf-grafik.png)

[![grafik.png](https://support.elaion.ch/uploads/images/gallery/2024-01/scaled-1680-/wzocapx7uVVAEPtd-grafik.png)](https://support.elaion.ch/uploads/images/gallery/2024-01/wzocapx7uVVAEPtd-grafik.png)

[![grafik.png](https://support.elaion.ch/uploads/images/gallery/2024-01/scaled-1680-/47Vpr5EAE2B53HjZ-grafik.png)](https://support.elaion.ch/uploads/images/gallery/2024-01/47Vpr5EAE2B53HjZ-grafik.png)

[![grafik.png](https://support.elaion.ch/uploads/images/gallery/2024-01/scaled-1680-/on6qqXBAS5euuKlM-grafik.png)](https://support.elaion.ch/uploads/images/gallery/2024-01/on6qqXBAS5euuKlM-grafik.png)

[![grafik.png](https://support.elaion.ch/uploads/images/gallery/2024-01/scaled-1680-/5OcvyO7szWXMWFUW-grafik.png)](https://support.elaion.ch/uploads/images/gallery/2024-01/5OcvyO7szWXMWFUW-grafik.png)

</td></tr><tr style="height: 179.167px;"><td style="height: 179.167px;">Nun ist ein Neustart von Word erforderlich. Klicke hier auf "OK".  
</td><td style="height: 179.167px;">[![grafik.png](https://support.elaion.ch/uploads/images/gallery/2024-01/scaled-1680-/vs7JjidBqHXYWOUL-grafik.png)](https://support.elaion.ch/uploads/images/gallery/2024-01/vs7JjidBqHXYWOUL-grafik.png)

</td></tr></tbody></table>

</div>#### **In Office (2013 oder anderen, nicht aktiviert) können auch keine Datenschutzeinstellungen zu sehen sein:**

[![grafik.png](https://support.elaion.ch/uploads/images/gallery/2024-01/scaled-1680-/23gVdGzXB9SE7cD1-grafik.png)](https://support.elaion.ch/uploads/images/gallery/2024-01/23gVdGzXB9SE7cD1-grafik.png)

##### 👇 Hier "Office Verbindung mit den Onlinediensten von Microsoft (NICHT) gestatten, ..." Häkchen raus:

[![grafik.png](https://support.elaion.ch/uploads/images/gallery/2024-01/scaled-1680-/H6mpvLcwX0RnrUXG-grafik.png)](https://support.elaion.ch/uploads/images/gallery/2024-01/H6mpvLcwX0RnrUXG-grafik.png)

#### OFFICE 2021 sieht so aus: (man hat nicht viele Haken zur Auswahl)

#### ![grafik.png](https://support.elaion.ch/uploads/images/gallery/2024-01/scaled-1680-/OwMA6sEAl4I1MUWv-grafik.png)Es reicht, wenn der Haken bei \*\***Optionale verbundene Erfahrung aktivieren**\*\* ENTFERNT.   


<div class="responsive-iframe" id="bkmrk--10"></div>---

<table border="1" id="bkmrk-auf-telegram-wirst-d" style="border-collapse: collapse; width: 100%; border-width: 0px; height: 95px;"><colgroup><col style="width: 8.33341%;"></col><col style="width: 91.7902%;"></col></colgroup><tbody><tr><td style="border-width: 0px;">[![grafik.png](https://www.anti-control.info/uploads/images/gallery/2024-07/scaled-1680-/JgEnYZRdli5OV6Vl-grafik.png)](https://t.me/anti_control_info)</td><td style="border-width: 0px;">##### <span style="color: rgb(0, 0, 0);">Auf Telegram wirst du informiert sobald ein neuer Artikel veröffentlicht wird!  
</span><span style="color: rgb(0, 0, 0);">HIER ABONNIEREN: </span><span style="color: rgb(0, 0, 0);">[https://t.me/anti\_control\_info](https://t.me/anti_control_info)</span>

</td></tr></tbody></table>

# OFFICE 365: Datenschutz-Häkchen in Office richtig setzen - KEINE Nutzempfehlung!

<div class="responsive-iframe" id="bkmrk-"><iframe allowfullscreen="allowfullscreen" frameborder="0" height="332" src="https://video.elaion.ch?video_by_id=tRogvW17UjHm" width="590"></iframe>

</div>[↓ Download](https://video.elaion.ch/data/videos_by_id/tRogvW17UjHm/tRogvW17UjHm_1080p.mp4?124_DatenschutzOffice365_END_v01.mp4)


#### **<span style="text-decoration: underline;">Schritt für Schritt Anleitung: </span>**

<p class="callout danger">**Empfehlung:** Bitte KEIN Office 365 für den Aufklärungsdienst nutzen! Steige lieber um auf [LibreOffice](https://support.elaion.ch/books/libreoffice-openoffice/page/libreoffice-als-alternative-fur-microsoft-office) oder Office 2016 (siehe Möglichkeit 2). Auch wenn du in den Datenschutzeinstellungen die folgenden Häkchen rausnimmst, gibt es KEINE Garantie, dass deine Daten gesichert sind und nicht "geklaut" werden. Da das Programm zu sehr mit der Cloud verbunden ist, ist das Arbeiten mit Office 365 NICHT sicher und damit grundsätzlich nicht geeignet!</p>

Wenn du Office 365 dennoch nutzen musst, dann hast du zwei Möglichkeiten:

> <span style="text-decoration: underline;">**Möglichkeit 1:**  
> </span>Nimm alle Häkchen in Office 365 raus, die Elias benennt (Erklärung siehe Tabelle unten) und achte darauf, dass du nur belanglose nicht dienstgefährdende Inhalte schreibst. (Keine sensitiven Daten aufschreiben, welche lohnenswert sind geklaut zu werden!)  
> Um weiterhin die Möglichkeit zu haben, auch sensitive Daten in einem Schreibprogramm aufschreiben zu können, installiere und nutze hierfür das Programm [Libre Office](https://www.anti-control.info/books/libreoffice/page/libreoffice-grundlagen-und-installation "LibreOffice: Grundlagen und Installation"). Dort solltest du ebenfallst die Häkchen abändern.

> <span style="text-decoration: underline;">**Möglichkeit 2:**  
> </span>Deinstalliere Office 365 und kaufe z.B. das Programm Office 2016. (Die Version 2016 ist die letzte Version, welche nicht in solch starkem Maße Daten an Microsoft übermittelt.)
> 
> Zum Kauf von Office 2016 empfiehlt Elias diesen Link:   
> Office 2016 "Standard Version", Preis: 26,90 Euro: [https://keys.express/EN/office-2016-standard.html](https://keys.express/EN/office-2016-standard.html)

#### Nun zur Erklärung, wie die Datenschutzhäkchen in Office 365 geändert werden können:

<table border="1" id="bkmrk-im-programm-office-3" style="border-collapse: collapse; width: 100%;"><colgroup><col style="width: 60.9331%;"></col><col style="width: 38.9577%;"></col></colgroup><tbody><tr><td>Im Programm Office 365 gehst du auf "Datei", wähle links unten "Optionen".  
</td><td>[![Screenshot 2024-01-09 220227.jpg](https://support.elaion.ch/uploads/images/gallery/2024-01/scaled-1680-/CurQmyvU4UBT3XdE-screenshot-2024-01-09-220227.jpg)](https://support.elaion.ch/uploads/images/gallery/2024-01/CurQmyvU4UBT3XdE-screenshot-2024-01-09-220227.jpg)

[![Screenshot 2024-01-09 220311.png](https://support.elaion.ch/uploads/images/gallery/2024-01/scaled-1680-/a1s9kxGDmcuXzojm-screenshot-2024-01-09-220311.png)](https://support.elaion.ch/uploads/images/gallery/2024-01/a1s9kxGDmcuXzojm-screenshot-2024-01-09-220311.png)

</td></tr><tr><td>Klicke dann links unten auf "Trust Center" und rechts auf "Einstellungen für das Trust Center"  
</td><td>[![Screenshot 2024-01-09 221105.png](https://support.elaion.ch/uploads/images/gallery/2024-01/scaled-1680-/TxPr1PsAjtB95QGN-screenshot-2024-01-09-221105.png)](https://support.elaion.ch/uploads/images/gallery/2024-01/TxPr1PsAjtB95QGN-screenshot-2024-01-09-221105.png)

[![Screenshot 2024-01-09 221215.png](https://support.elaion.ch/uploads/images/gallery/2024-01/scaled-1680-/b2AaEIAiPloBQdx6-screenshot-2024-01-09-221215.png)](https://support.elaion.ch/uploads/images/gallery/2024-01/b2AaEIAiPloBQdx6-screenshot-2024-01-09-221215.png)

</td></tr><tr><td>Klicke links unten auf "Datenschutzoptionen" und rechts auf "Datenschutzeinstellungen".  
</td><td>[ ](https://support.elaion.ch/uploads/images/gallery/2024-01/DDgQYsLtTLHdpgXI-screenshot-2024-01-09-212110.png)

[![Screenshot 2024-01-09 221409.png](https://support.elaion.ch/uploads/images/gallery/2024-01/scaled-1680-/e3yeqCj7H3biY7pI-screenshot-2024-01-09-221409.png)](https://support.elaion.ch/uploads/images/gallery/2024-01/e3yeqCj7H3biY7pI-screenshot-2024-01-09-221409.png)

[![Screenshot 2024-01-09 221457.jpg](https://support.elaion.ch/uploads/images/gallery/2024-01/scaled-1680-/ai5oLHLaxIZWpKhw-screenshot-2024-01-09-221457.jpg)](https://support.elaion.ch/uploads/images/gallery/2024-01/ai5oLHLaxIZWpKhw-screenshot-2024-01-09-221457.jpg)

</td></tr><tr><td>Dort siehst du verschiedene Felder mit Häkchen aufgereiht. Diese musst du **alle** demarkieren, sodass alle Häkchen draußen sind. Rechts ein Beispiel eines zu demarkierenden Häkchens.   
</td><td>[![Screenshot 2024-01-09 221651.png](https://support.elaion.ch/uploads/images/gallery/2024-01/scaled-1680-/aI4JFelxIHwj5qYX-screenshot-2024-01-09-221651.png)](https://support.elaion.ch/uploads/images/gallery/2024-01/aI4JFelxIHwj5qYX-screenshot-2024-01-09-221651.png)

</td></tr><tr><td>Wenn alle Häkchen demarkiert sind, klicke auf "OK", nochmal "OK". Ein Neustart ist dann erforderlich. Dort auch "OK" klicken.  
</td><td>  
[![Screenshot 2024-01-09 221703.png](https://support.elaion.ch/uploads/images/gallery/2024-01/scaled-1680-/G9E3qbFP0eYBnWrl-screenshot-2024-01-09-221703.png)](https://support.elaion.ch/uploads/images/gallery/2024-01/G9E3qbFP0eYBnWrl-screenshot-2024-01-09-221703.png)

 [![Screenshot 2024-01-09 221710.png](https://support.elaion.ch/uploads/images/gallery/2024-01/scaled-1680-/W6MeiAwMmoy503yy-screenshot-2024-01-09-221710.png)](https://support.elaion.ch/uploads/images/gallery/2024-01/W6MeiAwMmoy503yy-screenshot-2024-01-09-221710.png)

[![Screenshot 2024-01-09 221720.png](https://support.elaion.ch/uploads/images/gallery/2024-01/scaled-1680-/yjQ5uMyp1ocur9Ak-screenshot-2024-01-09-221720.png)](https://support.elaion.ch/uploads/images/gallery/2024-01/yjQ5uMyp1ocur9Ak-screenshot-2024-01-09-221720.png)

</td></tr></tbody></table>

<p class="callout info">Hier die Anleitung zu LibreOffice:  
[https://www.anti-control.info/books/libreoffice/page/libreoffice-grundlagen-und-installation](https://www.anti-control.info/books/libreoffice/page/libreoffice-grundlagen-und-installation "LibreOffice: Grundlagen und Installation")</p>

---

<table border="1" id="bkmrk-auf-telegram-wirst-d" style="border-collapse: collapse; width: 100%; border-width: 0px; height: 95px;"><colgroup><col style="width: 8.33341%;"></col><col style="width: 91.7902%;"></col></colgroup><tbody><tr><td style="border-width: 0px;">[![grafik.png](https://www.anti-control.info/uploads/images/gallery/2024-07/scaled-1680-/JgEnYZRdli5OV6Vl-grafik.png)](https://t.me/anti_control_info)</td><td style="border-width: 0px;">##### <span style="color: rgb(0, 0, 0);">Auf Telegram wirst du informiert sobald ein neuer Artikel veröffentlicht wird!  
</span><span style="color: rgb(0, 0, 0);">HIER ABONNIEREN: </span><span style="color: rgb(0, 0, 0);">[https://t.me/anti\_control\_info](https://t.me/anti_control_info)</span>

</td></tr></tbody></table>

# OFFICE MAC: Datenschutz-Häkchen in Office richtig setzen - keine Überwachung

<div class="responsive-iframe" id="bkmrk-"><iframe allowfullscreen="allowfullscreen" frameborder="0" height="332" src="https://video.elaion.ch?video_by_id=aNiUpMe3xfbQ" width="590"></iframe>

</div><div class="responsive-iframe" id="bkmrk-%E2%86%93-download">[↓ Download](https://video.elaion.ch/data/videos_by_id/aNiUpMe3xfbQ/aNiUpMe3xfbQ_1080p.mp4?125_DatenschutzOfficeMac_END_v01.mp4)</div><div class="responsive-iframe" id="bkmrk--1"></div>#### **<span style="text-decoration: underline;">Schritt-für-Schritt-Anleitung:</span>**

##### OFFICE MAC: Datenschutz-Häkchen in Office so setzen, dass möglichst wenig Daten an Microsoft übermittelt werden

<div class="responsive-iframe" id="bkmrk-%C2%A0-1"> </div><p class="callout success">Wenn das einmal in Word oder in einem anderen Programm gemacht wurde, zählt es auch für alle anderen installierten Microsoft Office Produkte.</p>

<div class="responsive-iframe" id="bkmrk--2"></div><div class="responsive-iframe" id="bkmrk--3"></div><div class="responsive-iframe" id="bkmrk-das-programm-word-%C3%B6f"><table border="1" style="border-collapse: collapse; width: 100%; height: 3881.35px;"><colgroup><col style="width: 50%;"></col><col style="width: 50%;"></col></colgroup><tbody><tr style="height: 258.35px;"><td style="height: 258.35px;">**Das Programm Word öffnen:**Im Dock auf das Word-Symbol klicken.

</td><td style="height: 258.35px;">[![Bildschirmfoto 2024-01-09 um 21.01.13.png](https://support.elaion.ch/uploads/images/gallery/2024-01/scaled-1680-/BP0nifFRm8oIT09J-bildschirmfoto-2024-01-09-um-21-01-13.png)](https://support.elaion.ch/uploads/images/gallery/2024-01/BP0nifFRm8oIT09J-bildschirmfoto-2024-01-09-um-21-01-13.png)

</td></tr><tr style="height: 605.9px;"><td style="height: 605.9px;">Oben auf **"Word"** klicken und dann auf **"Einstellungen"**.</td><td style="height: 605.9px;">[![Bildschirmfoto 2024-01-09 um 20.46.36.png](https://support.elaion.ch/uploads/images/gallery/2024-01/scaled-1680-/Gto66oGFDzXyh0OF-bildschirmfoto-2024-01-09-um-20-46-36.png)](https://support.elaion.ch/uploads/images/gallery/2024-01/Gto66oGFDzXyh0OF-bildschirmfoto-2024-01-09-um-20-46-36.png)

[![Bildschirmfoto 2024-01-09 um 20.46.53.png](https://support.elaion.ch/uploads/images/gallery/2024-01/scaled-1680-/UnGALErIvBg5FSzn-bildschirmfoto-2024-01-09-um-20-46-53.png)](https://support.elaion.ch/uploads/images/gallery/2024-01/UnGALErIvBg5FSzn-bildschirmfoto-2024-01-09-um-20-46-53.png)

</td></tr><tr style="height: 505.483px;"><td style="height: 505.483px;">Klicke bei den Word-Einstellungen auf **"Datenschutz"**.  
(Bei Office 2016**: "Sicherheit und Datenschutz"**)  
</td><td style="height: 505.483px;">[![Bildschirmfoto 2024-01-09 um 21.15.57.png](https://support.elaion.ch/uploads/images/gallery/2024-01/scaled-1680-/3NfojVvL2ovMEa8l-bildschirmfoto-2024-01-09-um-21-15-57.png)](https://support.elaion.ch/uploads/images/gallery/2024-01/3NfojVvL2ovMEa8l-bildschirmfoto-2024-01-09-um-21-15-57.png)

[  
![Bildschirmfoto 2024-01-09 um 21.15.57 2.png](https://support.elaion.ch/uploads/images/gallery/2024-01/scaled-1680-/Z3FxYoUEzyMLegGN-bildschirmfoto-2024-01-09-um-21-15-57-2.png)Office 2016:](https://support.elaion.ch/uploads/images/gallery/2024-01/Z3FxYoUEzyMLegGN-bildschirmfoto-2024-01-09-um-21-15-57-2.png)[![Ofiice2016_mac_01.png](https://support.elaion.ch/uploads/images/gallery/2024-01/scaled-1680-/j46rJIPMhu9pYR7p-ofiice2016-mac-01.png)](https://support.elaion.ch/uploads/images/gallery/2024-01/j46rJIPMhu9pYR7p-ofiice2016-mac-01.png)

</td></tr><tr style="height: 724.2px;"><td style="height: 724.2px;">Bitte nimm den <span style="text-decoration: underline;">Hacken raus</span> bei **"Optionale verbundene Erfahrungen"**. (siehe eingerahmtes Info-Kästchen)

</td><td style="height: 724.2px;">[![Bildschirmfoto 2024-01-09 um 21.28.14.png](https://support.elaion.ch/uploads/images/gallery/2024-01/scaled-1680-/Fw72qM5rQhYuivis-bildschirmfoto-2024-01-09-um-21-28-14.png)](https://support.elaion.ch/uploads/images/gallery/2024-01/Fw72qM5rQhYuivis-bildschirmfoto-2024-01-09-um-21-28-14.png)[![Bildschirmfoto 2024-01-09 um 21.28.40.png](https://support.elaion.ch/uploads/images/gallery/2024-01/scaled-1680-/BlgW44IEAtOYIf8I-bildschirmfoto-2024-01-09-um-21-28-40.png)](https://support.elaion.ch/uploads/images/gallery/2024-01/BlgW44IEAtOYIf8I-bildschirmfoto-2024-01-09-um-21-28-40.png)

</td></tr><tr style="height: 1023.6px;"><td style="height: 1023.6px;">**Bei Office 2019:** Klicke auf **"Verbundene Erfahrungen verwalten"** und nimm **ALLE Hacken raus.**

</td><td style="height: 1023.6px;">[![Ofiice2019_mac_01.png](https://support.elaion.ch/uploads/images/gallery/2024-01/scaled-1680-/euMCtdjhsclXdqvv-ofiice2019-mac-01.png)](https://support.elaion.ch/uploads/images/gallery/2024-01/euMCtdjhsclXdqvv-ofiice2019-mac-01.png)[![Ofiice2019_mac_02.png](https://support.elaion.ch/uploads/images/gallery/2024-01/scaled-1680-/dE8F3WEBmhs2ly46-ofiice2019-mac-02.png)](https://support.elaion.ch/uploads/images/gallery/2024-01/dE8F3WEBmhs2ly46-ofiice2019-mac-02.png)</td></tr><tr style="height: 505.467px;"><td style="height: 505.467px;">Dann bitte Word schließen und **neu starten**, damit die neuen Einstellungen aktiviert werden.

Zum Schließen das rote Kreuzchen oben links drücken.

Zum neu Starten auf das Word-Symbol im Dock klicken.

</td><td style="height: 505.467px;">[![Bildschirmfoto 2024-01-09 um 21.44.28.png](https://support.elaion.ch/uploads/images/gallery/2024-01/scaled-1680-/3ZYWfdB4ihiM73vk-bildschirmfoto-2024-01-09-um-21-44-28.png)](https://support.elaion.ch/uploads/images/gallery/2024-01/3ZYWfdB4ihiM73vk-bildschirmfoto-2024-01-09-um-21-44-28.png)

[![Bildschirmfoto 2024-01-09 um 21.01.13.png](https://support.elaion.ch/uploads/images/gallery/2024-01/scaled-1680-/BP0nifFRm8oIT09J-bildschirmfoto-2024-01-09-um-21-01-13.png)](https://support.elaion.ch/uploads/images/gallery/2024-01/BP0nifFRm8oIT09J-bildschirmfoto-2024-01-09-um-21-01-13.png)

</td></tr><tr style="height: 258.35px;"><td style="height: 258.35px;"><p class="callout success">Wenn ihr das einmal in Word macht, dann zählt es auch für Excel, Power-Point und alle installierten Microsoft Office Produkte.</p>

</td><td style="height: 258.35px;">[![Bildschirmfoto 2024-01-09 um 21.01.13 2.png](https://support.elaion.ch/uploads/images/gallery/2024-01/scaled-1680-/r6G3kG7KsSVzHltB-bildschirmfoto-2024-01-09-um-21-01-13-2.png)](https://support.elaion.ch/uploads/images/gallery/2024-01/r6G3kG7KsSVzHltB-bildschirmfoto-2024-01-09-um-21-01-13-2.png)

</td></tr></tbody></table>

</div>---

<table border="1" id="bkmrk-auf-telegram-wirst-d" style="border-collapse: collapse; width: 100%; border-width: 0px; height: 95px;"><colgroup><col style="width: 8.33341%;"></col><col style="width: 91.7902%;"></col></colgroup><tbody><tr><td style="border-width: 0px;">[![grafik.png](https://www.anti-control.info/uploads/images/gallery/2024-07/scaled-1680-/JgEnYZRdli5OV6Vl-grafik.png)](https://t.me/anti_control_info)</td><td style="border-width: 0px;">##### <span style="color: rgb(0, 0, 0);">Auf Telegram wirst du informiert sobald ein neuer Artikel veröffentlicht wird!  
</span><span style="color: rgb(0, 0, 0);">HIER ABONNIEREN: </span><span style="color: rgb(0, 0, 0);">[https://t.me/anti\_control\_info](https://t.me/anti_control_info)</span>

</td></tr></tbody></table>

# Outlook Einstellungen - Sicherheit überprüfen

Leider birgt nur die Benutzung von Outlook schon ein Risiko, wie Alles, was mit dem Internet  
kommuniziert.  
Deshalb ist auch immer die besondere Aufmerksamkeit des Benutzers gefragt. Es gibt nur wenige  
Einstellungen, mit denen man die Sicherheit noch etwas erhöhen kann. Dies entbindet jedoch  
niemanden davon größtmögliche Vorsicht walten zu lassen.  
Folgende Einstellungen sollten optimiert werden, dabei wurde auf eine gute Balance zwischen  
praktikabel und sicher geachtet.  
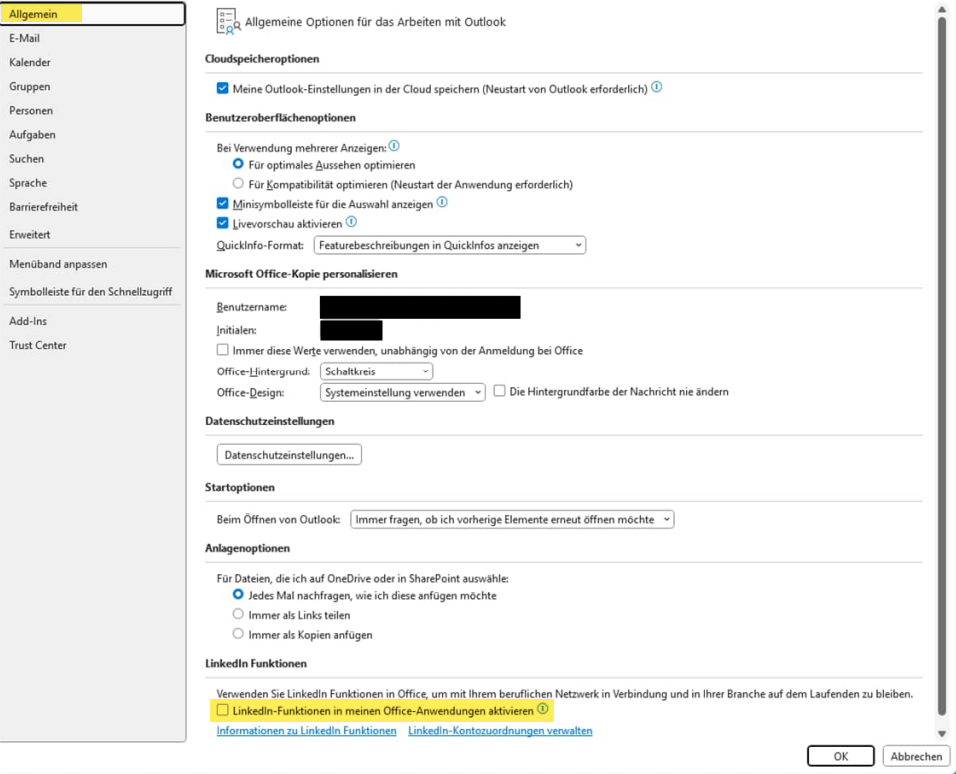
Im Outlook Hauptfenster, unter dem Menü „Datei“ findet man das Untermenü „Optionen“.  
Hier gelangt man in ein neues Fenster „Outlook-Optionen“. Ganz unten steht eine Option zu  
LinkedIn-Funktionen, dies sollte deaktiviert sein.

[![image.png](https://www.anti-control.info/uploads/images/gallery/2025-10/scaled-1680-/0U62efhfHVnR9uKU-image.png)](https://www.anti-control.info/uploads/images/gallery/2025-10/0U62efhfHVnR9uKU-image.png)

**Als Erstes unter „Erweitert“ -&gt; Lesebereich folgende Einstellungen prüfen und einstellen.**

[![Screenshot 2025-10-01 201043.png](https://www.anti-control.info/uploads/images/gallery/2025-10/scaled-1680-/myvKEt6PtuEVsaq8-screenshot-2025-10-01-201043.png)
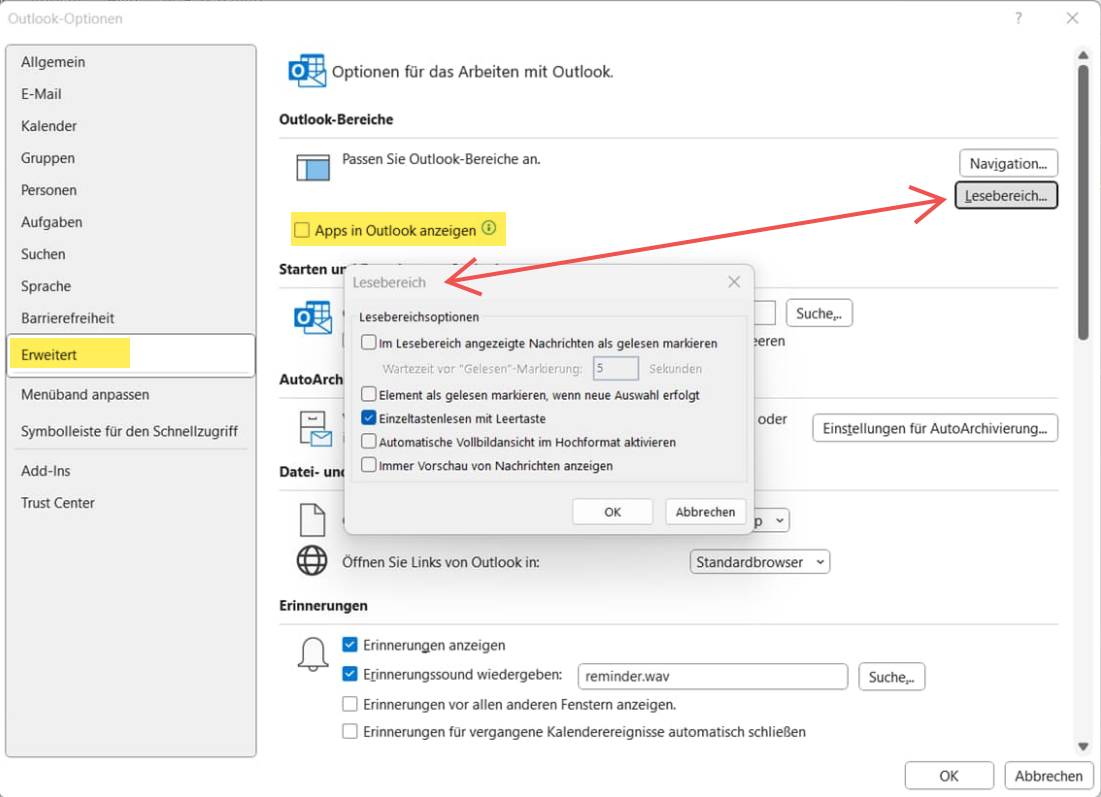
](https://www.anti-control.info/uploads/images/gallery/2025-10/myvKEt6PtuEVsaq8-screenshot-2025-10-01-201043.png)

**Auch sollte „Apps in Outlook anzeigen“ nicht aktiviert sein.**

**Weiter unten im Menü „Erweitert“ befindet sich die Rubrik RSS-Feeds, hier sollte nichts aktiviert  
sein. Ganz unten unter „Sonstige“ sollte nur die oberste und die 4-te Option angehakt sein.  
Wie hier:**

[![image.png](https://www.anti-control.info/uploads/images/gallery/2025-10/scaled-1680-/GiiFWrmhI8bGjQvT-image.png)](https://www.anti-control.info/uploads/images/gallery/2025-10/GiiFWrmhI8bGjQvT-image.png)

**Weiter geht es im Menü Add-Ins, dort bitte bei „Verwalten:“ COM-Add-Ins**  
**den Button Los... klicken**

[![grafik.png](https://www.anti-control.info/uploads/images/gallery/2025-10/scaled-1680-/ckQJZOcwW2YAri4u-grafik.png)
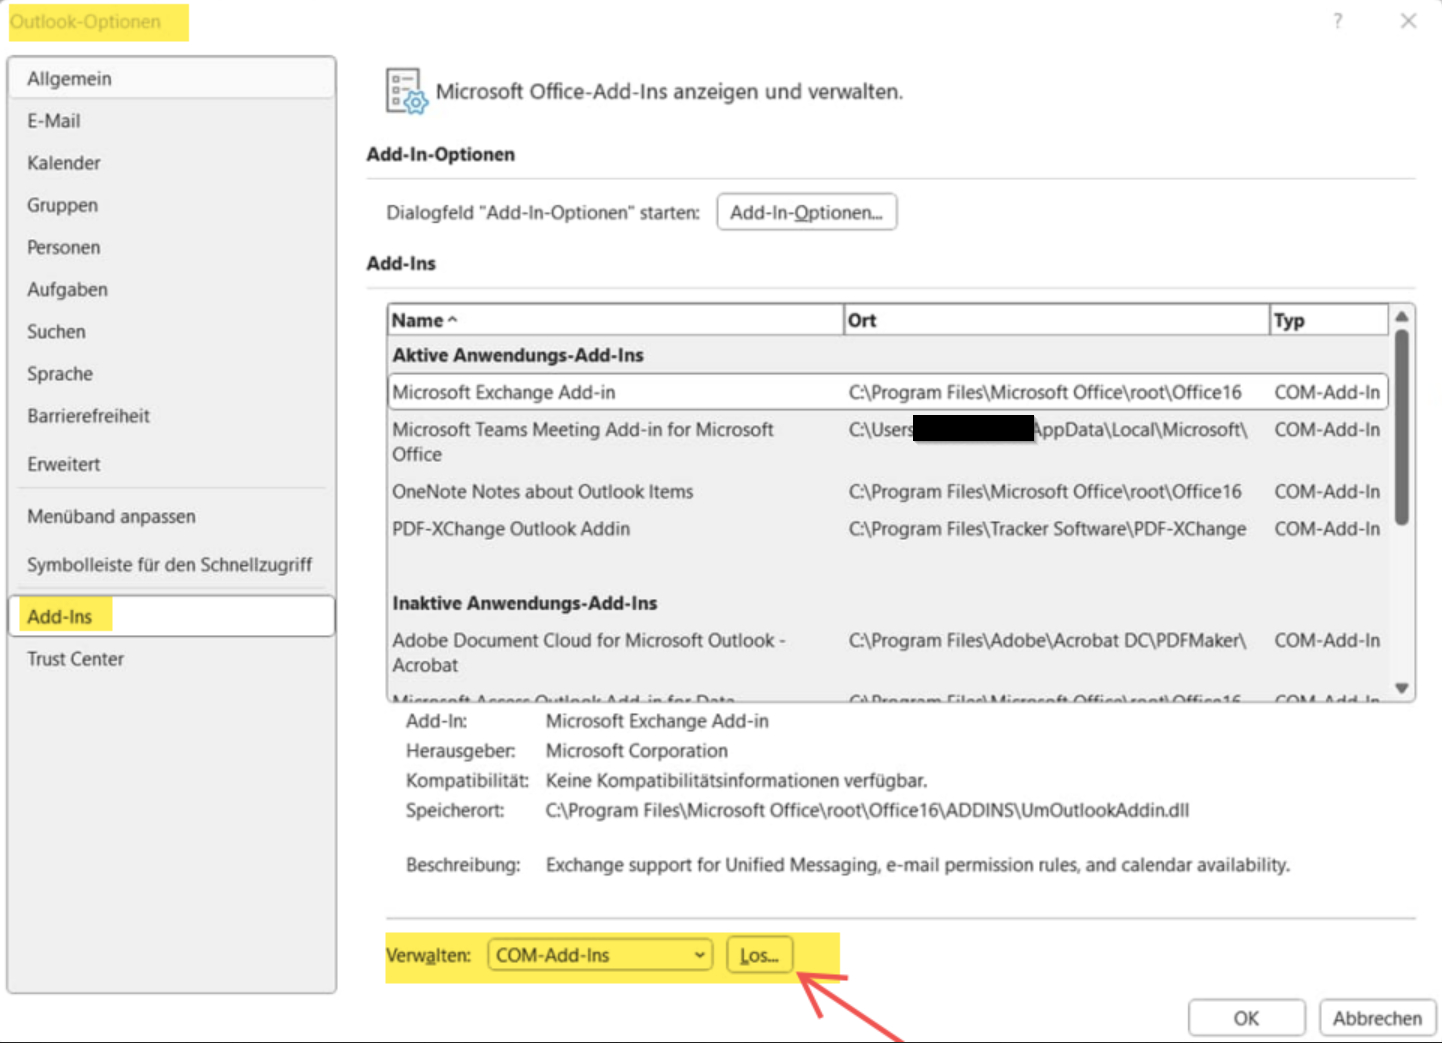
](https://www.anti-control.info/uploads/images/gallery/2025-10/ckQJZOcwW2YAri4u-grafik.png)

**Es folgt darauf dieses Fenster:**

[![image.png](https://www.anti-control.info/uploads/images/gallery/2025-10/scaled-1680-/NUrr23rc2m172M4j-image.png)
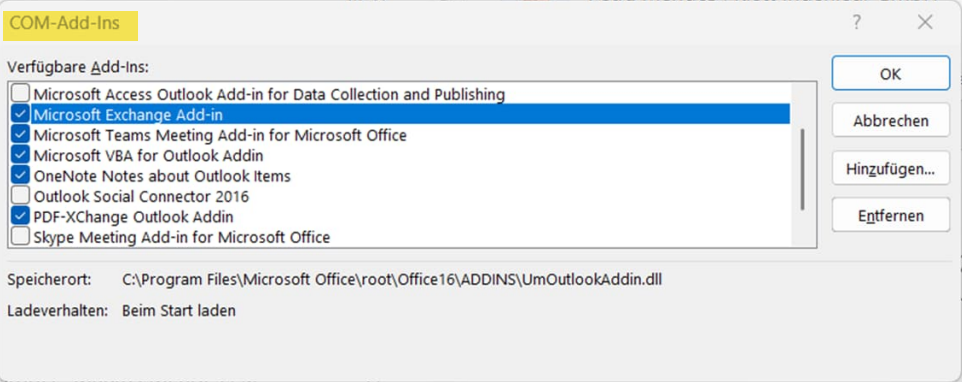
](https://www.anti-control.info/uploads/images/gallery/2025-10/NUrr23rc2m172M4j-image.png)

**Hier sollten lediglich die 5 Optionen wie im Fenster oben aktiviert sein.**

**Menü “Trust Center” in den Outlook Optionen:  
Hier beim Microsoft Outlook-Trust Center die Schaltfläche „Einstellungen für das Trust Center…“  
anklicken, es öffnet sich das Fenster Trust Center.  
Das sollte dann bei dem Punkt „Vertrauenswürdige Herausgeber“ wie unten aussehen, falls nicht  
bitte bei der IT melden.**

[![image.png](https://www.anti-control.info/uploads/images/gallery/2025-10/scaled-1680-/U6ykLif1GMJAYjlO-image.png)
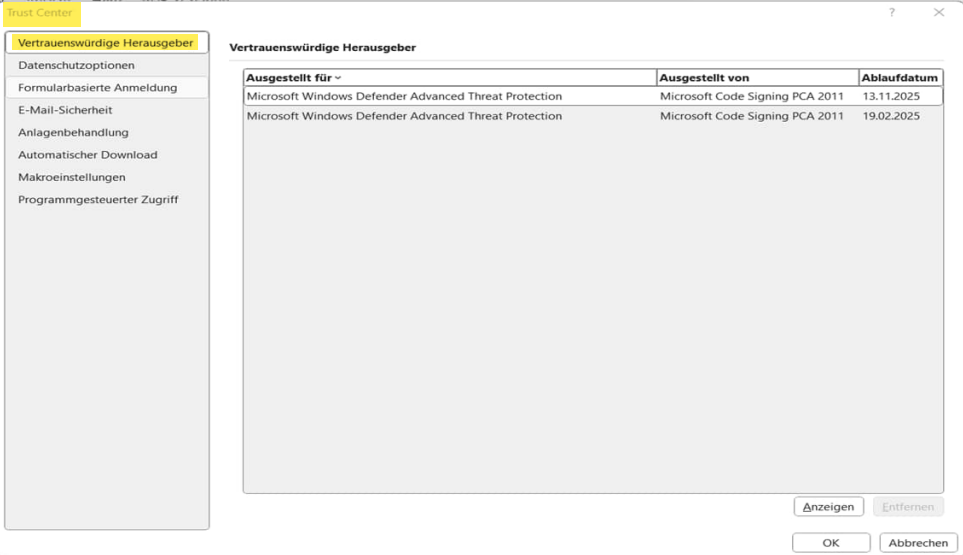
](https://www.anti-control.info/uploads/images/gallery/2025-10/U6ykLif1GMJAYjlO-image.png)

**Im Trust Center bleiben und die folgenden Fenster abarbeiten.**  
**Datenschutzoptionen -&gt; Datenschutzeinstellungen…, sollte auch wie unten aussehen**

[![image.png](https://www.anti-control.info/uploads/images/gallery/2025-10/scaled-1680-/AkNRK4Z5zmt8XTMx-image.png)](https://www.anti-control.info/uploads/images/gallery/2025-10/AkNRK4Z5zmt8XTMx-image.png)

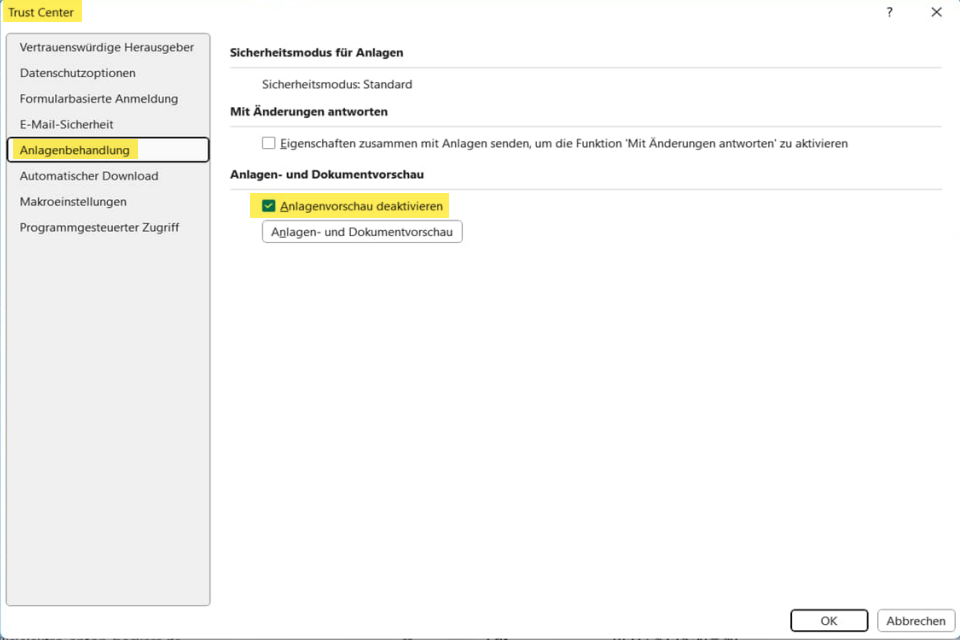
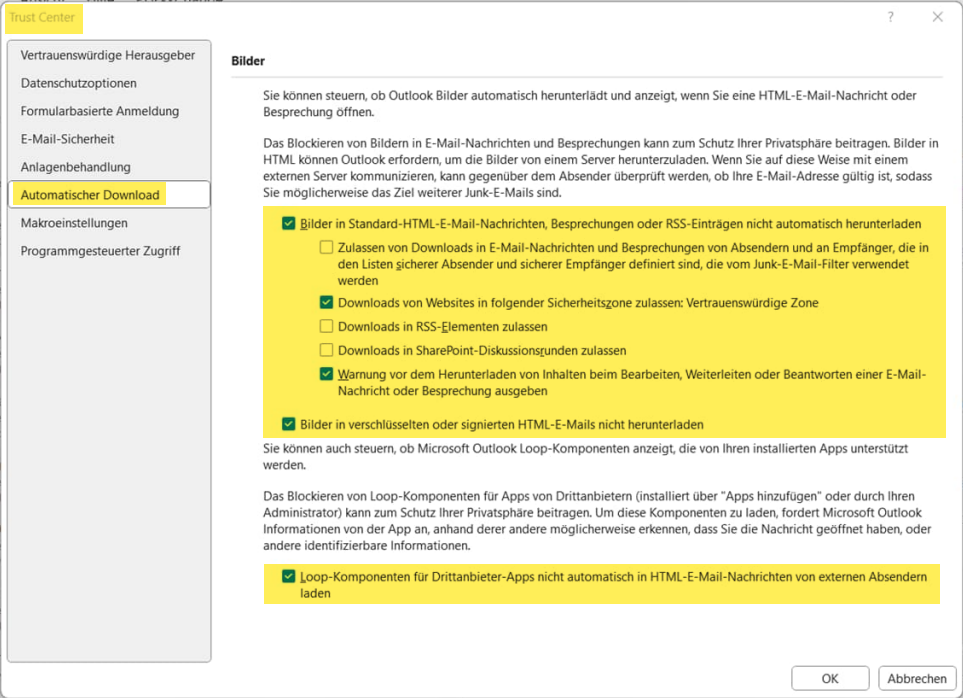
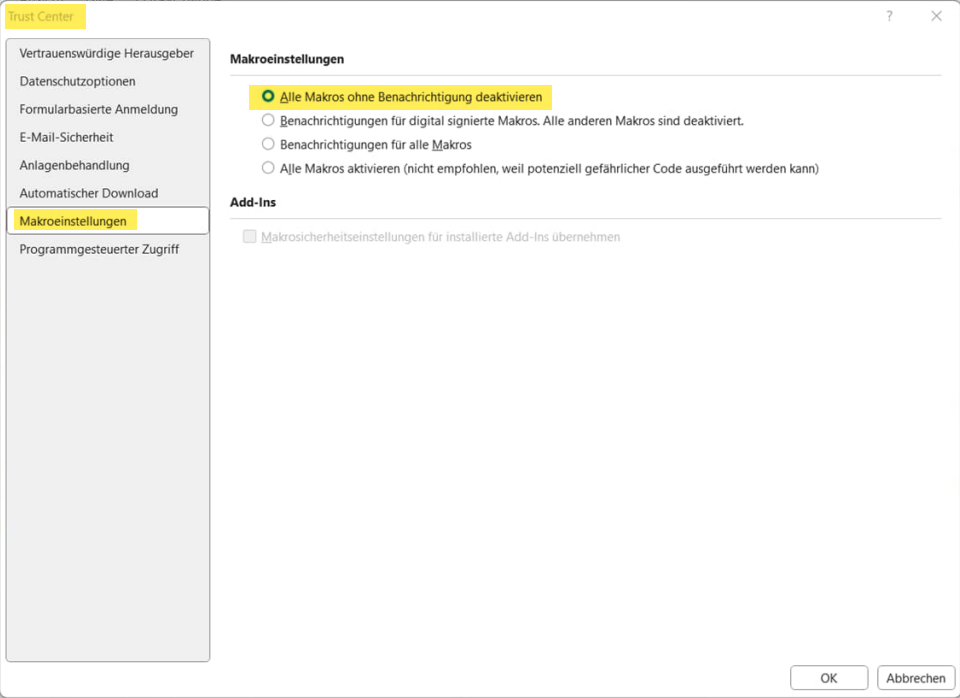
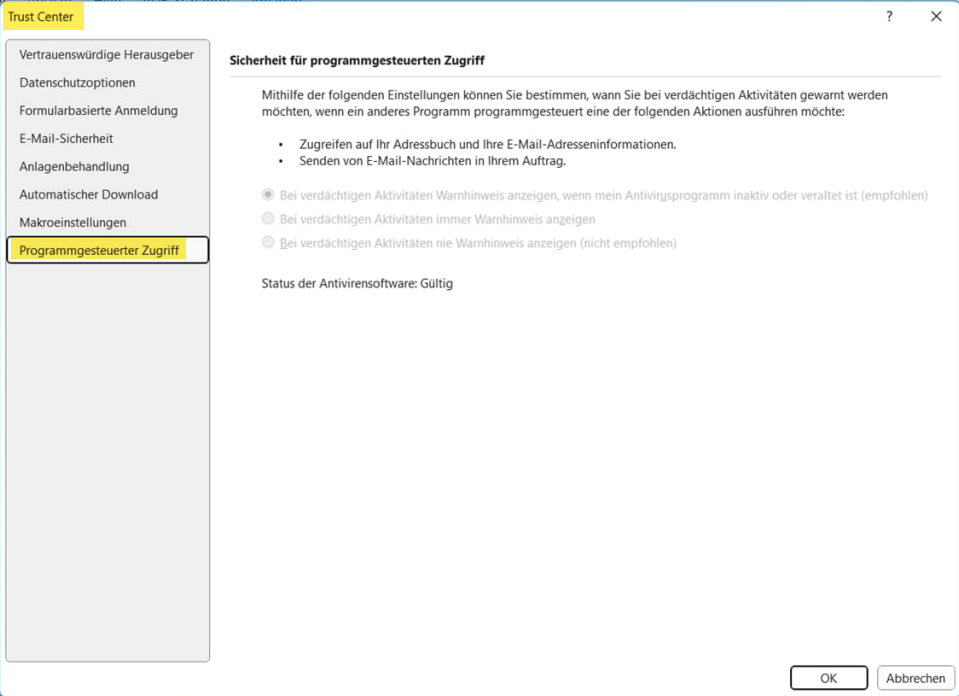
**Alle folgenden Menüfenster bitte vergleichen und gegebenenfalls wie gezeigt anpassen.**

[![image.png](https://www.anti-control.info/uploads/images/gallery/2025-10/scaled-1680-/Cqs9ezpqdHEIs6Zo-image.png)
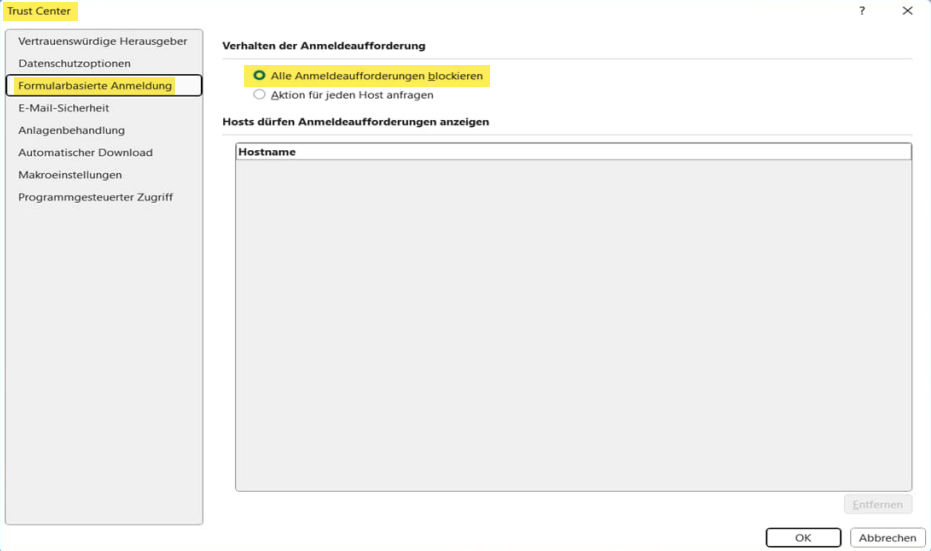
](https://www.anti-control.info/uploads/images/gallery/2025-10/Cqs9ezpqdHEIs6Zo-image.png)

[![image.png](https://www.anti-control.info/uploads/images/gallery/2025-10/scaled-1680-/Z1lffpAEq2RhuOBx-image.png)](https://www.anti-control.info/uploads/images/gallery/2025-10/Z1lffpAEq2RhuOBx-image.png)

[![image.png](https://www.anti-control.info/uploads/images/gallery/2025-10/scaled-1680-/IePK7fYkXlu2H2EV-image.png)
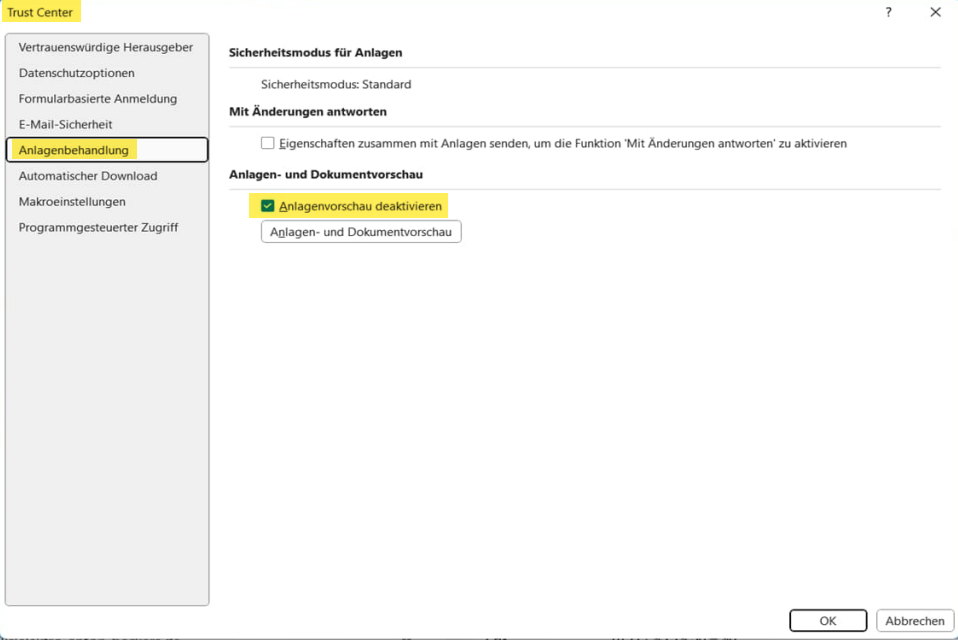
](https://www.anti-control.info/uploads/images/gallery/2025-10/IePK7fYkXlu2H2EV-image.png)

[![image.png](https://www.anti-control.info/uploads/images/gallery/2025-10/scaled-1680-/guvszh9p6rv0A4kF-image.png)
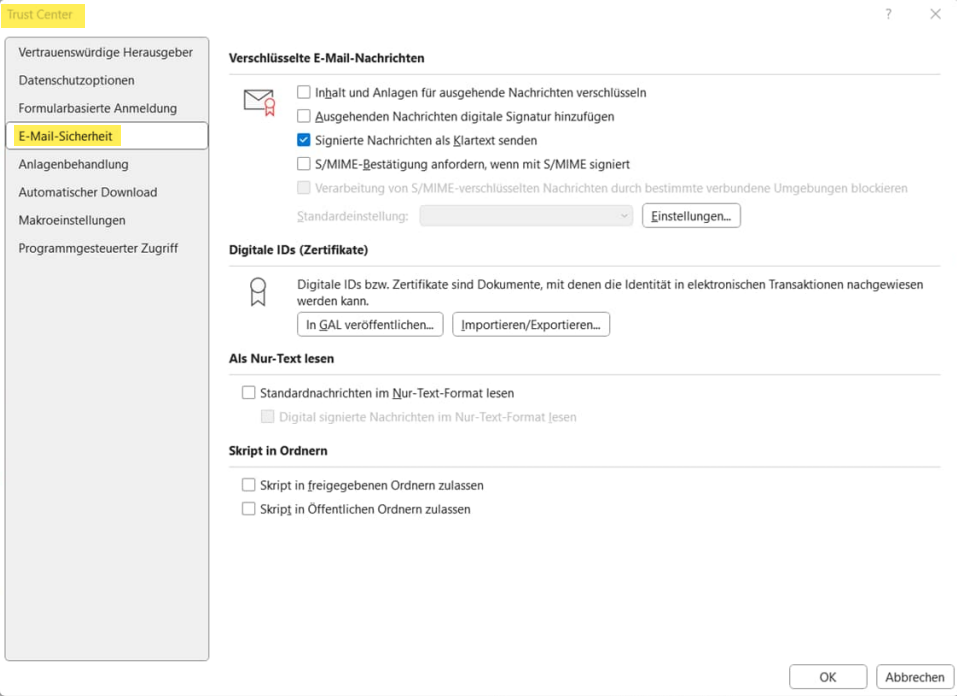
](https://www.anti-control.info/uploads/images/gallery/2025-10/guvszh9p6rv0A4kF-image.png)

[![image.png](https://www.anti-control.info/uploads/images/gallery/2025-10/scaled-1680-/z6HQlyKj1NWnetLo-image.png)](https://www.anti-control.info/uploads/images/gallery/2025-10/z6HQlyKj1NWnetLo-image.png)

[![image.png](https://www.anti-control.info/uploads/images/gallery/2025-10/scaled-1680-/cN1dyNSKADYgpmoI-image.png)](https://www.anti-control.info/uploads/images/gallery/2025-10/cN1dyNSKADYgpmoI-image.png)

[![image.png](https://www.anti-control.info/uploads/images/gallery/2025-10/scaled-1680-/stv8rHH6SwAe8uTK-image.png)](https://www.anti-control.info/uploads/images/gallery/2025-10/stv8rHH6SwAe8uTK-image.png)

[![image.png](https://www.anti-control.info/uploads/images/gallery/2025-10/scaled-1680-/2PdRsH12GZDxpC2e-image.png)](https://www.anti-control.info/uploads/images/gallery/2025-10/2PdRsH12GZDxpC2e-image.png)

[![image.png](https://www.anti-control.info/uploads/images/gallery/2025-10/scaled-1680-/Xa84bs1EmwVLEuAc-image.png)](https://www.anti-control.info/uploads/images/gallery/2025-10/Xa84bs1EmwVLEuAc-image.png)

**Damit sind die Einstellungen, die kontrolliert und angepasst werden müssen, abgeschlossen.**

# Abmelden von Microsoft-Konto in Microsoft Office

<div class="responsive-iframe" id="bkmrk--1"></div><p class="callout info">Diese Anleitung ist für alle Microsoft Office Versionen (Win+Mac).</p>

#### **Windows:**

<div class="responsive-iframe" id="bkmrk-"><iframe allowfullscreen="allowfullscreen" frameborder="0" height="332" src="https://video.elaion.ch?video_by_id=WsUjU34SjOyP" width="590"></iframe>

</div><div class="responsive-iframe" id="bkmrk--2"></div><div class="responsive-iframe" id="bkmrk--3"></div>
<div class="responsive-iframe" id="bkmrk-%E2%86%93-download">[↓ Download](https://video.elaion.ch/data/videos_by_id/WsUjU34SjOyP/WsUjU34SjOyP_1080p.mp4?1301_Abmelden%20MS-Konto%20WIN_v02_CONVERT.mp4)</div><div class="responsive-iframe" id="bkmrk--4"></div><div class="responsive-iframe" id="bkmrk--7"></div><div class="responsive-iframe" id="bkmrk--8"></div><div class="responsive-iframe" id="bkmrk--9"></div>#### **MAC:**

<div class="responsive-iframe" id="bkmrk--5"></div><div class="responsive-iframe" id="bkmrk--6"></div><div class="responsive-iframe" id="bkmrk--10"></div><div class="responsive-iframe" id="bkmrk--11"></div><div class="responsive-iframe" id="bkmrk-%E2%86%93-download-1">  
</div><div class="responsive-iframe" id="bkmrk--12"><iframe allowfullscreen="allowfullscreen" frameborder="0" height="332" src="https://video.elaion.ch?video_by_id=gMdTdAjDGbes" width="590"></iframe>

</div><div class="responsive-iframe" id="bkmrk-%E2%86%93-download-2">  
[↓ Download](https://video.elaion.ch/data/videos_by_id/gMdTdAjDGbes/gMdTdAjDGbes_1080p.mp4?1302_AbmeldenMSKontoMAC_END_v01.mp4)</div><div class="responsive-iframe" id="bkmrk--13"></div>#### <span style="text-decoration: underline;">**Schritt-für-Schritt-Anleitungen:** </span>

Dieser Artikel erklärt euch, wie ihr prüfen könnt, ob euer Microsoft Office mit dem Microsoft-Konto verbunden ist. Wenn es verbunden ist, kann man sich abmelden.

Wenn du Office **2007** oder **2010** hast, dann brauchst du nichts machen. Dort gibt es diese Funktion gar nicht.

<p class="callout warning"><span style="text-decoration: underline;">**Windows oder Mac: Office 365**</span>  
Wenn du Office 365 hast, dann **darfst du dich <span style="text-decoration: underline;">nicht</span> abmelden**, sonst verlierst du die Lizenz. Dann verlierst du die Verbindung von deinem Word zum Office 365. Das muss immer verbunden sein, sonst funktioniert Word nicht. Siehe Support-Artikel: [**OFFICE 365: Datenschutz-Häkchen in Office richtig setzen - KEINE Nutzempfehlung für Dienst!**](https://www.anti-control.info/books/microsoft-office/page/office-365-datenschutz-hakchen-in-office-richtig-setzen-keine-nutzempfehlung "OFFICE 365: Datenschutz-Häkchen in Office richtig setzen - KEINE Nutzempfehlung!")  
</p>


## Windows: Office 2013 - 2021

<table border="1" id="bkmrk-wenn-du-%22word%22-aufma" style="border-collapse: collapse; width: 100%;"><colgroup><col style="width: 49.9444%;"></col><col style="width: 49.9444%;"></col></colgroup><tbody><tr><td style="height: 179.183px;"><span style="font-size: 11.0pt; line-height: 107%; font-family: 'Calibri',sans-serif; mso-ascii-theme-font: minor-latin; mso-fareast-font-family: Calibri; mso-fareast-theme-font: minor-latin; mso-hansi-theme-font: minor-latin; mso-bidi-font-family: 'Times New Roman'; mso-bidi-theme-font: minor-bidi; mso-ansi-language: DE; mso-fareast-language: EN-US; mso-bidi-language: AR-SA;">Wenn du Word aufmachst, siehst du oben rechts, neben dem "Schließen-Knopf", einen Knopf "Anmelden". </span>

<span style="font-size: 11.0pt; line-height: 107%; font-family: 'Calibri',sans-serif; mso-ascii-theme-font: minor-latin; mso-fareast-font-family: Calibri; mso-fareast-theme-font: minor-latin; mso-hansi-theme-font: minor-latin; mso-bidi-font-family: 'Times New Roman'; mso-bidi-theme-font: minor-bidi; mso-ansi-language: DE; mso-fareast-language: EN-US; mso-bidi-language: AR-SA;">Wenn da "**Anmelden**" steht, dann bist du dir sicher, dass du **nicht** angemeldet bist, dass das Office nicht mit dem Online-Konto verbunden ist. Du brauchst hier nichts weiter machen.</span>

</td><td style="height: 179.183px;">[![anmelden.png](https://support.elaion.ch/uploads/images/gallery/2024-01/scaled-1680-/hsULDHGSxQpSptFw-anmelden.png)](https://support.elaion.ch/uploads/images/gallery/2024-01/hsULDHGSxQpSptFw-anmelden.png)
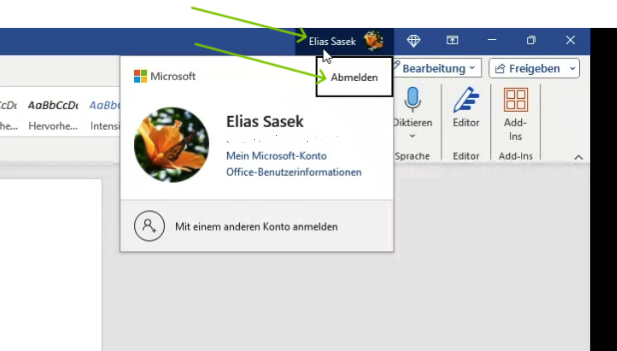
</td></tr><tr><td style="height: 188.183px;"><span style="font-size: 11.0pt; line-height: 107%; font-family: 'Calibri',sans-serif; mso-ascii-theme-font: minor-latin; mso-fareast-font-family: Calibri; mso-fareast-theme-font: minor-latin; mso-hansi-theme-font: minor-latin; mso-bidi-font-family: 'Times New Roman'; mso-bidi-theme-font: minor-bidi; mso-ansi-language: DE; mso-fareast-language: EN-US; mso-bidi-language: AR-SA;">Wenn da oben <span style="text-decoration: underline;">nicht</span> "Anmelden" steht, sondern wie hier zum Beispiel "Elias Sasek", dann siehst du, ich bin hier verbunden mit dem Microsoft-Konto und es werden auch entsprechend Daten teilweise automatisch auf Microsoft gespeichert. Die Verbindung ist da. </span>

<span style="font-size: 11.0pt; line-height: 107%; font-family: 'Calibri',sans-serif; mso-ascii-theme-font: minor-latin; mso-fareast-font-family: Calibri; mso-fareast-theme-font: minor-latin; mso-hansi-theme-font: minor-latin; mso-bidi-font-family: 'Times New Roman'; mso-bidi-theme-font: minor-bidi; mso-ansi-language: DE; mso-fareast-language: EN-US; mso-bidi-language: AR-SA;">Um diese Verbindung zu trennen: </span><span style="font-size: 11.0pt; line-height: 107%; font-family: 'Calibri',sans-serif; mso-ascii-theme-font: minor-latin; mso-fareast-font-family: Calibri; mso-fareast-theme-font: minor-latin; mso-hansi-theme-font: minor-latin; mso-bidi-font-family: 'Times New Roman'; mso-bidi-theme-font: minor-bidi; mso-ansi-language: DE; mso-fareast-language: EN-US; mso-bidi-language: AR-SA;">Klicke auf deinen Namen und dann auf "Abmelden". </span>

</td><td style="height: 188.183px;">[![pqGmAtrcZ6bpYCDd-grafik.png](https://www.anti-control.info/uploads/images/gallery/2024-07/scaled-1680-/0VSZHsmfQZ62rDp2-pqgmatrcz6bpycdd-grafik.png)](https://www.anti-control.info/uploads/images/gallery/2024-07/0VSZHsmfQZ62rDp2-pqgmatrcz6bpycdd-grafik.png)

</td></tr><tr><td style="height: 205.183px;"><span style="font-size: 11.0pt; line-height: 107%; font-family: 'Calibri',sans-serif; mso-ascii-theme-font: minor-latin; mso-fareast-font-family: Calibri; mso-fareast-theme-font: minor-latin; mso-hansi-theme-font: minor-latin; mso-bidi-font-family: 'Times New Roman'; mso-bidi-theme-font: minor-bidi; mso-ansi-language: DE; mso-fareast-language: EN-US; mso-bidi-language: AR-SA;">Es erscheint ein Fenster, dort klickst du erneut auf "Abmelden" und bist draußen.</span></td><td style="height: 205.183px;">[![fenster.png](https://support.elaion.ch/uploads/images/gallery/2024-01/scaled-1680-/BGbZOiD16YMrONFX-fenster.png)](https://support.elaion.ch/uploads/images/gallery/2024-01/BGbZOiD16YMrONFX-fenster.png)

</td></tr></tbody></table>

<p class="callout info">Es sollte sich dort möglichst jeder abmelden, dann ist man nicht direkt mit der Cloud verbunden und es werden weniger Daten bei den großen Tech-Konzernen landen.   
</p>

<div class="responsive-iframe" id="bkmrk-%C2%A0-4"></div>
## MAC: Office 2013 - 2021  


Hier zeigen wir euch, wie ihr euch auf **Mac** vom Microsoft-Konto abmelden könnt, falls ihr das Office in Verbindung mit einem Microsoft-Konto nutzt:

<table border="1" id="bkmrk-ich-zeige-euch%2C-wie-" style="border-collapse: collapse; width: 100%;"><colgroup><col style="width: 61.1789%;"></col><col style="width: 38.7098%;"></col></colgroup><tbody><tr><td>Fall A: Mac OHNE Microsoft-Konto-Verbindung

Öffne ein Word-Dokument und klicke oben links auf "Word". Falls Euer Mac NICHT mit einem Microsoft-Konto verbunden ist, findet an dieser Stelle nirgends einen Knopf mit „Abmelden“. Das heisst, hier muss ich nichts tun.

</td><td>[![image.png](https://support.elaion.ch/uploads/images/gallery/2024-01/scaled-1680-/YOvzjNlOIXyA6pVi-image.png)](https://support.elaion.ch/uploads/images/gallery/2024-01/YOvzjNlOIXyA6pVi-image.png)

  
</td></tr><tr><td style="height: 299.883px;">Fall B: Mac MIT Microsoft-Konto-Verbindung

Hier ein anderer **Mac**, der verbunden ist mit dem Microsoft-Konto. Wenn man bei einem geöffneten Word-Dokument oben auf "Microsoft Word" drauf klickt, sieht man die Option "Abmelden". Wenn diese Option verfügbar ist, dann **auf "Abmelden" drücken** ...

</td><td style="height: 299.883px;">[![image.png](https://support.elaion.ch/uploads/images/gallery/2024-01/scaled-1680-/xqjml4FNlmn4aIfE-image.png)](https://support.elaion.ch/uploads/images/gallery/2024-01/xqjml4FNlmn4aIfE-image.png)

</td></tr><tr><td style="height: 223.183px;">
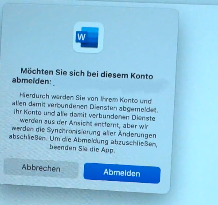
... es öffnet sich nun ein neues Fenster. Hier bitte erneut auf "Abmelden" klicken. Dann ist man sicher, dass diese Lizenz **<span style="color: rgb(0, 0, 0);">keine </span>**<span style="color: rgb(0, 0, 0);">Daten mit dem Microsoft-Konto austauscht.</span>

</td><td style="height: 223.183px;">[![O2fXefLLSzqLUdnU-image.png](https://www.anti-control.info/uploads/images/gallery/2024-07/scaled-1680-/SBCH5eIzu4QRhrE6-o2fxefllszqludnu-image.png)](https://www.anti-control.info/uploads/images/gallery/2024-07/SBCH5eIzu4QRhrE6-o2fxefllszqludnu-image.png)

</td></tr></tbody></table>

<div class="responsive-iframe" id="bkmrk--16"></div><div class="responsive-iframe" id="bkmrk--17"></div>---

<table border="1" id="bkmrk-auf-telegram-wirst-d" style="border-collapse: collapse; width: 100%; border-width: 0px; height: 95px;"><colgroup><col style="width: 8.33341%;"></col><col style="width: 91.7902%;"></col></colgroup><tbody><tr><td style="border-width: 0px;">[![grafik.png](https://www.anti-control.info/uploads/images/gallery/2024-07/scaled-1680-/JgEnYZRdli5OV6Vl-grafik.png)](https://t.me/anti_control_info)</td><td style="border-width: 0px;">##### <span style="color: rgb(0, 0, 0);">Auf Telegram wirst du informiert sobald ein neuer Artikel veröffentlicht wird!  
</span><span style="color: rgb(0, 0, 0);">HIER ABONNIEREN: </span><span style="color: rgb(0, 0, 0);">[https://t.me/anti\_control\_info](https://t.me/anti_control_info)</span>

</td></tr></tbody></table>